 |
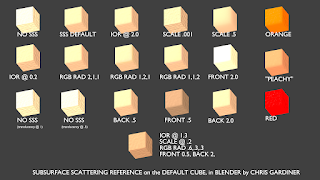
| Subsurface Scattering Reference for Blender 3D Software Applied to the Default Cube |
Subsurface Scattering (SSS)
If you look at my most recent posts across my blog and some other social media spots you may start to forget I am a photographer and more of an aspiring 3D modeller. But regardless, here is another one for the whole realm of Blender 3D software enthusiasts.
I do a lot of reading, and one thing I didn't find in my searches is was something to help me understand how blender's subsurface scattering works. So I've taken it upon myself to create some subsurface scattering reference cards. They show you what happens when you change each of the SSS settings from their default, and in different lighting conditions, from a balanced lighting setup, to a heavily backlit, and a heavily side lit setup.
For everyone else wondering what is Subsurface scattering - it is the way light scatters when it enters a translucent object. In this case, I wanted to show how you may set up your Blender settings while trying to approach a realistic human skin. You know when you hold your hand up to a lightbulb or the sun and you can see parts of it glowing, that is subsurface scattering at work - or as you'll also see it referred to - simply "SSS".
About my little 'Demo' or 'References'
This test was applied to the default cube. It has sides measuring 2 blender units - which is important for SSS because of the way it measures the "scale" setting in SSS which is one of the most important factors of achieving the SSS you want.
I used the default material settings of a Lambert Diffused Shader with 0.8 Intensity, and just 'eyeballed' a skin tone for the colour.
The Specularity is done with the basic CookTorr method with a 50 hardness and 0.5 intensity.
I applied a procedural cloud texture to the normals to very quickly simulate a skin texture so you can see how the settings affect the specularity of your object. Other than that, for every cube, I left the SSS default settings the same, and changed only one - and that is the setting I listed below the cube. In the case of the cube on the bottom, that is a collection of a few settings changed that I think is approaching a semi-real skin material. Admittedly, I have only been interested in 3D rendering for the last few months - but I am a photographer first so I am an excellent observer of the properties of light - which is what realistic 3D modelling is all about anyways.
For the many tutorials out there for Blender 3D that have helped me along the way, this is the first thing I thought I could give back to the creative community. I hope it helps some of you!
Thanks for reading, and now here are the reference sheets - they are rendered at UHD resolution with 16 samples of anti aliasing with a catmul-rom filter in Blender Internal Render.
My Skin Material
In the bottom box, I chose some settings for SSS that are approaching the qualities of what I see in human skin.
Most importantly is the scale - this defines how far into the material your light is scattered and to my understanding, it depends heavily on the size of your object. So that is why I used the standard default cube for this test.
The next more important settings I found were the front and back scattering. I use a low front scatter and a higher back scatter because - in the real world it is easier to notice the translucency of your own hand when it is between the light source and your eye. When we use a higher front scattering, the light that would be making specular highlights on your skin is actually penetrating into the skin and making it glow - which didn't seem entirely realistic to me. That is just what I have noticed though, so I hope these images help you find a material that works well for you.
Simple 3 Point Lighting Setup - Front Fill, strong back and side light
 |
| Simple 3 Point Lighting Setup to demonstrate different Subsurface Scattering Setups in Blender |
One Light Setup - Heavy Backlit
 |
| One light of heavy backlighting to demonstrate different Subsurface Scattering Setups in Blender |
One Light Setup - Heavy Sidelight
 |
| One light of strong side lighting to demonstrate different Subsurface Scattering Setups in Blender |
One Light Setup - Heavy Front Lighting
 |
| One light of heavily front lit cubes to demonstrate different Subsurface Scattering Setups in Blender |